Zones represent locations on a map that are used in the Aero Ranger system to filter vehicle reads and/or enforce rules defined in the Zone Category assigned to each Zone. If a vehicle is detected within the boundaries of a Zone, it will be associated with that Zone and checked against any relevant Zone rules.
From the Dashboard, select Zones Management on the left-side menu to navigate to the Zones Management page.
Existing Zones will show up on the left-side menu, where you can select to edit or delete Zones. Zones that share the same Zone Category are grouped by colour.

Click the Zoom On Map button to quickly zoom to the location of a specific zone on the right-hand side map.
To create a new Zone, select the Add Zone button at the top of the map view.

Begin drawing a polygon on the map by clicking to set the first corner. If you don’t get the shape perfect, you can always edit it later. Move and click to set new points of the polygon, and when you’re finished double-click to close the shape. Ensure the polygon doesn’t overlap itself at any point.

After you have confirmed the shape of the zone, the Zone edit panel will be displayed, allowing you to edit the Zone name and select a Zone Category.

Once a Zone Category is selected, the associated rules will be displayed. For info on how to edit Zone Category rules, see Manage Zone Categories.
In the Capacity bar, set the total number of parking bays/parking spots available in the Zone when it is empty. This is used to calculate Zone Utilisation data automatically to give you insights on busy times and the overall usage of the zone throughout the day.

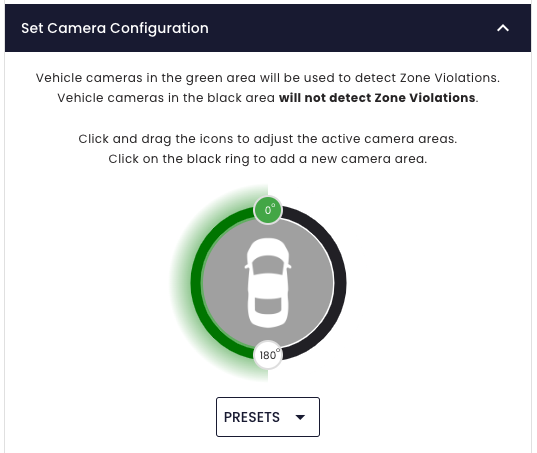
Under the Set Camera Configuration dropdown, you can configure if you would like to ignore Zone Violations from cameras placed on certain sides of the vehicle.
For example, the image below shows a Camera Configuration that will ignore Zone Violations detected from cameras mounted on the right-hand side of the vehicle.
This can be useful to exclude false-positives from oncoming traffic.
Once you’re finished editing the Zone information, select Submit to create the zone.
To edit a zone, select the Edit button next to an existing Zone on the left-hand panel and edit the shape, or leave as-is and then press the Confirm button at the top of the map view to continue editing the Zone name and Zone Category. Press Cancel to abandon the editing process.
